


Jewelry Photography Ideas


Photographing jewelry can be a challenging yet rewarding endeavor, whether you're capturing the brilliance of a diamond ring, the intricate details of a gemstone necklace, or the craftsmanship of a designer watch. The key to stunning jewelry photography lies in mastering a few essential techniques and tricks that will help you highlight the beauty and allure of each piece. At erase.bg, we understand the importance of showcasing your jewelry in the best possible light, and we're here to guide you through the process
Jewelry photography presents unique challenges, primarily due to the smooth, shiny surfaces that often cause chaotic reflections and the small size of the pieces that require high magnification and sufficient depth of field. Achieving the perfect shot involves a careful balance of lighting, props, and post-production techniques. In our series of jewelry photography classes, we offer step-by-step guides for shooting various types of jewelry, ensuring you can capture professional-quality images that truly sparkle.
In this blog post, we'll share some of the most important tips for jewelry photography, from setting up your studio lighting and selecting the right equipment to mastering post-production. Whether you're a seasoned photographer or just starting, these insights will help you elevate your jewelry photography and make your images shine. Welcome to the world of jewelry photography at erase.bg!
Why a Perfect Jewelry Shoot Matters?
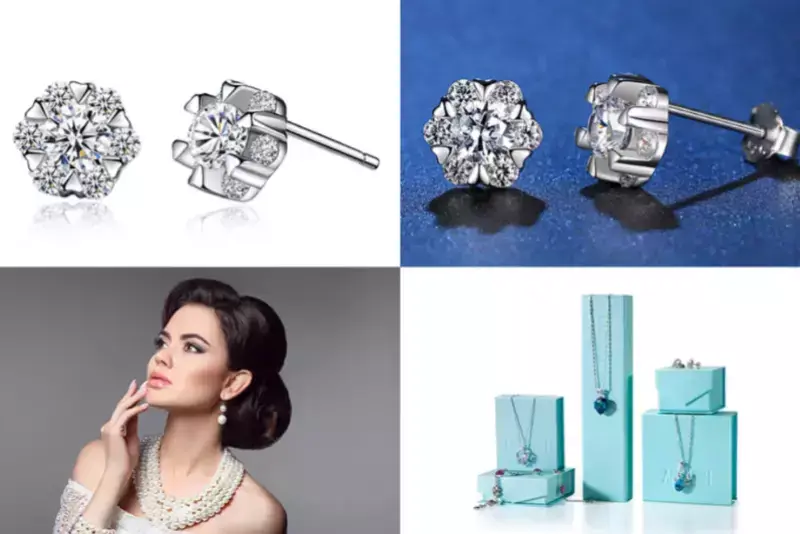
A perfect jewelry shoot is essential for capturing the intricate details and craftsmanship of each piece, creating a captivating first impression. High-quality images enhance perceived value, authenticity, and professionalism, which are crucial for building trust and boosting online sales. They also play a vital role in effective marketing, increasing engagement, and driving traffic.
Accurate, well-lit photos reduce customer returns and dissatisfaction by providing a true representation of the product. At erase.bg, we understand the impact of stunning jewelry photography on your brand's reputation and sales, and we aim to help you achieve flawless results.
Backgrounds For Jewelry Photography
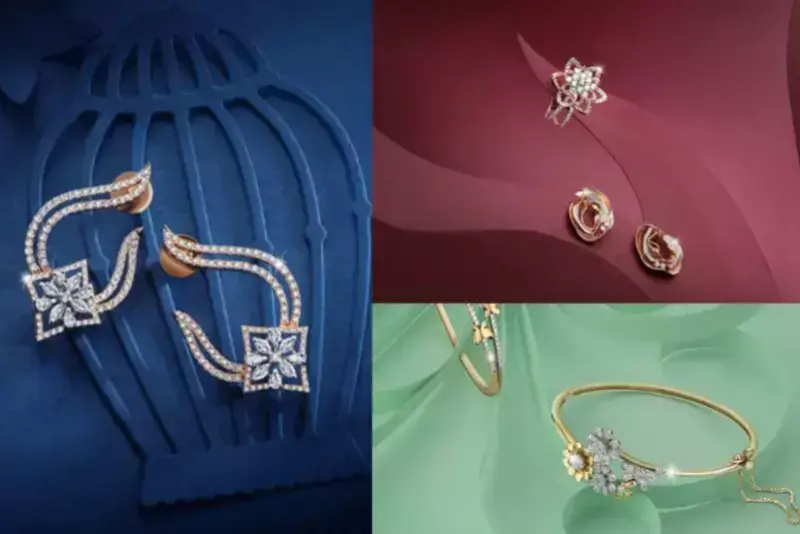
Before considering lens choice or lighting, selecting the right background is crucial for jewelry photography. The background should enhance your product without overpowering it, using colors, textures, and shapes that complement your piece. For instance, a blue gemstone necklace surrounded by diamonds can be beautifully showcased on smooth acrylic tiles arranged in a floating staircase above a textured slate.
This juxtaposition of smooth and textured surfaces can add depth and interest to your shot, drawing attention to the jewelry while providing a visually appealing contrast. On the other hand, a smooth, polished metal necklace might look best on matte black tubes that match its tones, creating a sleek and modern look. For simpler, cleaner looks, plain backgrounds can be very effective. When shooting rings, a plain white background can make the jewelry stand out without any distractions.
The key is to choose a background that complements the jewelry's style and enhances its features. Once you've decided on the layout and background, ensure the products are clean to save time in post-production. Only after finalizing the composition should you start experimenting with lighting, as any styling adjustments will significantly impact the lighting setup. The right background sets the stage for perfect lighting and composition, ultimately leading to stunning jewelry photographs.
What’s the Best Camera For Jewelry Photography?
Choosing the best camera for jewelry photography depends on several factors, such as budget, desired image quality, and specific features. Here are a few considerations:
- Resolution and Detail: Look for a camera with high resolution (at least 20 megapixels) to capture intricate details of jewelry pieces effectively.
- Lens Quality: Invest in a camera with a macro lens capability or a lens that allows for close-up shots with excellent clarity and minimal distortion.
- Sensor Size: Cameras with larger sensors tend to perform better in low-light conditions and offer a better depth of field control, which can be crucial for jewelry photography.
- Manual Controls: Having manual controls over settings like aperture, shutter speed, and ISO sensitivity allows for greater creative control and flexibility in various shooting environments.
- Tethering Capability: If you plan to shoot tethered to a computer for immediate review and adjustments, ensure the camera supports tethered shooting.
Popular choices often include DSLR cameras like Canon EOS 5D Mark IV or Nikon D850 or mirrorless options like the Sony Alpha series (such as A7R IV) due to their high-resolution sensors and excellent lens options. Ultimately, the best camera for jewelry photography is one that meets your specific needs and budget while delivering high-quality, detailed images of your jewelry pieces.
Mastering the Photographic Process For Jewelry
Creating stunning jewelry photographs requires a meticulous approach, starting with selecting the perfect background. The background plays a crucial role in enhancing the visual appeal of the jewelry without overpowering it. By carefully choosing colors, textures, and shapes that complement the piece, you can create a captivating and harmonious composition.
For example, juxtaposing smooth acrylic tiles with textured slate can add depth to a blue gemstone necklace, while matte black tubes can provide a sleek backdrop for a polished metal necklace. A clean, plain background might be ideal for simpler pieces like rings, ensuring they stand out without distractions. Once the background is set, it's essential to clean the jewelry thoroughly to avoid time-consuming post-production work.
With the background and jewelry prepared, you can then focus on experimenting with lighting. Proper lighting is critical as it highlights the intricate details and brilliance of the jewelry. Any small styling adjustment can impact the lighting, so it's vital to finalize the composition before perfecting the light setup. By following a systematic photographic process, from background selection to meticulous lighting, you can achieve professional-quality jewelry photographs that truly shine.
Jewelry Photography Lighting For Different Ornaments
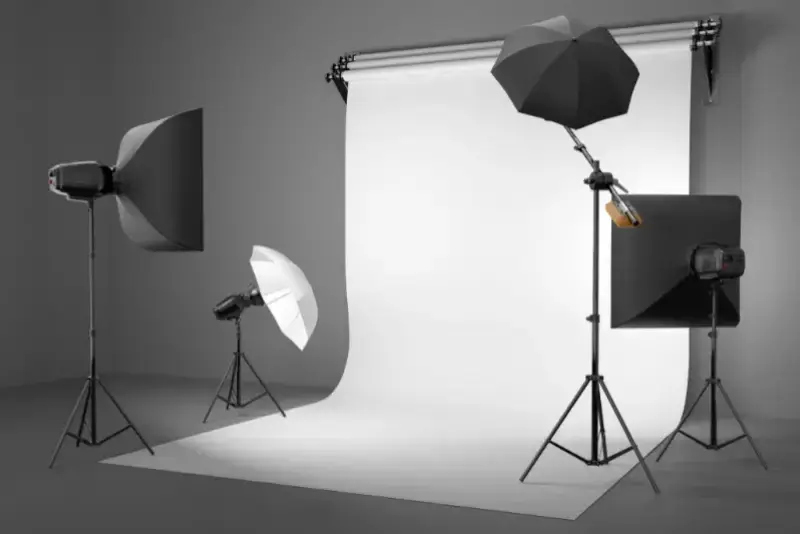
Effective lighting is crucial in jewelry photography to enhance the unique characteristics of different ornaments. Each type of jewelry, from diamonds and gemstones to gold, silver, pearls, beads, colored gemstones, and complex designs, requires specific lighting techniques to showcase its beauty accurately by understanding how to manipulate light, whether through diffused, indirect, or multiple sources photographers can bring out the sparkle, texture, and intricate details of each piece.
This comprehensive approach ensures that jewelry photographs not only capture but also enhance the allure and craftsmanship that make these ornaments irresistible to viewers and potential buyers alike.
- Diamonds and Gemstones: Bright, diffused lighting is crucial to bring out the sparkle and brilliance of diamonds and gemstones. Avoid direct light that creates harsh reflections. Softboxes or diffusers help to distribute light evenly, enhancing clarity and minimizing unwanted shadows.
- Gold and Silver: Soft, indirect lighting is ideal for gold and silver jewelry to reveal their textures and reflective surfaces without causing glare. Reflective cards or bounce lighting can add subtle highlights.
- Pearls and Beads: Gentle, even lighting preserves the natural luster and texture of pearls and beads. Soft, diffused light sources such as light tents or softboxes prevent harsh shadows and highlight smooth surfaces effectively.
- Colored Gemstones: Adjust lighting to complement each gemstone's color and clarity. Use color-corrected light sources to accurately capture the gem's hues and facets, ensuring vibrant and true-to-life representation in photographs.
- Complex Designs: Multiple light sources are essential to illuminate intricate designs evenly. This approach highlights the craftsmanship and intricate details of complex jewelry pieces, ensuring every element is showcased without shadows or overexposure. Adjust light angles to emphasize textures and depths, enhancing the overall visual appeal of the jewelry.
Jewelry Photography Lighting Setups for Necklaces
Creating stunning jewelry photographs, particularly for necklaces, requires careful attention to lighting setups. A combination of lights can produce remarkable results, bringing out the sparkle and color of the gemstones and metals. Here's a detailed breakdown of the lighting setups I used for two different necklace shots.
Lighting Setup for a Blue Gemstone Necklace
For the blue gemstone necklace, I started with a bare bulb directed through a sheet of white acrylic placed behind the product. This setup diffused the light, resulting in a soft, gradient illumination that served as the main fill light. I experimented with the placement of this light, moving it closer and further away, as well as adjusting its position left, right, up, and down.
This initial light alone provided a pleasing result, but to truly make the gemstones sparkle, I needed additional lights. I incorporated a second light, a small ball of light, to create specularity and add extra sparkle to the gemstones. To enhance the color of the blue gemstone, I added a picolite with a projection attachment, directing a precise beam of light onto the gemstone. Alternatively, a very precise snoot could achieve a similar effect. This combination of lights resulted in a more vibrant and dynamic image.
Lighting Setup for a Diamond Necklace
For the diamond necklace, which featured broader metallic tones and smoother surfaces, I created a 'light tent' using reflector cards. This involved shining a light through the acrylic sheet to create a smooth gradient light, then placing white panels in front and above to wrap the necklace in light. This setup added sparkle to the diamonds at the front and provided an even, diffused illumination.
Although the initial light setup provided great results, I added a second light – a picolite with a projection attachment – shining from the front to bring out additional sparkle. The final image of the diamond necklace, achieved using this two-light setup, showcased the brilliance and clarity of the diamonds.
Jewelry photography Lighting Setups for Rings
Photographing rings presents unique challenges due to their curved, shiny surfaces, which reflect everything from the base surface and background to the photographer. To minimize these reflections, a more complex lighting setup is often required compared to necklaces. Here's a detailed look at how to achieve stunning ring photographs.
Minimizing Reflections with a Light Tent
To tackle the issue of excessive reflections, I used a conical-shaped light tent similar to the one employed for the diamond necklace. This tent covered the rings while still allowing light to shine through, effectively minimizing unwanted reflections. For frequent use, a durable, heat-resistant Light Cone modifier, like the one developed in partnership with V-Flats, can be an invaluable part of your photography kit. These light cones help create gradient lighting, enhancing the overall appearance of your jewelry.
Lighting Setup for Rings
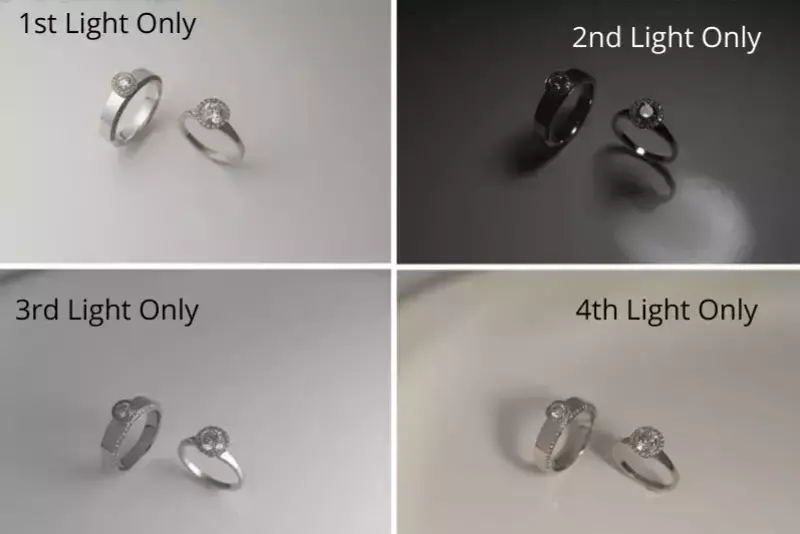
The key light for my ring photography setup was a bare bulb point light source. To add sparkle to the diamond's face, I used an additional light. Another light was directed to illuminate the metalwork of the bands, and yet another was used to highlight the diamonds on the band.
This multi-light approach ensured that each part of the ring was properly lit, enhancing the overall brilliance and detail of the jewelry. The image below illustrates the effect of each light on the final photograph.
Solving Depth of Field Issues with Focus Stacking
Once the lighting was perfected, the next challenge was achieving sufficient depth of field. Even with an aperture set to f11, the small size of the rings and the close working distance made it difficult to get everything in sharp focus. To overcome this, I used a technique called focus stacking. Focus stacking involves taking multiple images, each with a different point of focus, and then blending these images in post-production to create a single, fully in-focus image.
When using focus stacking, it's crucial to have your camera locked down. You then capture a series of images, gradually shifting your focus from the front to the back of the object. In post-production, I aligned these shots in Photoshop, resulting in a scene where the entire ring was sharp and detailed throughout.
How to Retouch Jewelry Photographs?
Retouching jewelry photographs can elevate your images to professional standards, ensuring every detail shines. Here's a step-by-step guide to effectively retouching your jewelry photos, particularly when using focus stacking.
Focus Stacking in Photoshop
Focus stacking can be a complex process, but Photoshop simplifies much of the work. Follow these steps:
1. Load Files into Photoshop: Open your series of images in Photoshop. Go to the 'File' tab, select 'Scripts,' and then 'Load Files into Stack.' In the dialogue box, choose 'Add Open Files' and check 'Attempt to Align Source Images Automatically.' This aligns your images but doesn't create the focus stack.
2. Align and Blend Layers: Select all your layers. From the 'Edit' tab, choose 'Auto Blend Layers.' Check 'Stack Images' and 'Seamless Tones and Colors.' Photoshop will create masks for each layer, detecting which areas are in focus to ensure the entire image is sharp.
3. Final Touches: Once your focus stack is complete, you can proceed with other post-production tasks.
Basic Post-Production Steps
To achieve a polished final image, follow these post-production steps:
1. Cleaning and Removing Imperfections: Use the Spot Healing Brush and Clone Stamp tools to remove dust, scratches, and other imperfections.
2. Enhancing Colors: Adjust the colors using the Hue/Saturation and Curve adjustments to make the gemstones and metals pop.
3. Composite Work: For images requiring composite work (like adding extra sparkle to diamonds), blend multiple shots. Use layer masks and the Brush tool to merge different exposures or lighting effects carefully.
4. Focus Stacking and Finishing Touches: For images like the rings that needed focus stacking, ensure all areas are sharp and clean up any visible artifacts from the stacking process. Apply finishing touches such as sharpening, contrast adjustment, and noise reduction to enhance the overall image quality.
Example: Retouching Different Jewelry Pieces
- Gemstone Necklace: This piece required basic Photoshop work such as cleaning, dust and scratch removal, and color enhancement.
- Diamond Necklace: This required some composite work to introduce sparkle in the diamonds. This involved blending a second shot with added sparkle into the primary image.
- Rings: Focus stacking was essential to ensure the entire ring was sharp. After stacking, general cleaning and finishing touches were applied.
By carefully planning your lighting and composition, you can minimize the amount of post-production required. However, these retouching steps are crucial to achieving a flawless, professional look in your jewelry photographs.
Top Jewelry Photography Tips
Photographing jewelry can seem like a daunting task – the products are generally small, and reflections can make it very difficult to get a good shot. However, by remembering the techniques covered here, you should be able to get some great results.
Think About Your Background and Props
Selecting the right background and props is crucial. The background should enhance your jewelry without overpowering it. Consider colors, textures, and shapes that complement your piece. Using appropriate props can add depth and interest to your shots.
Clean Your Jewelry Before Shooting
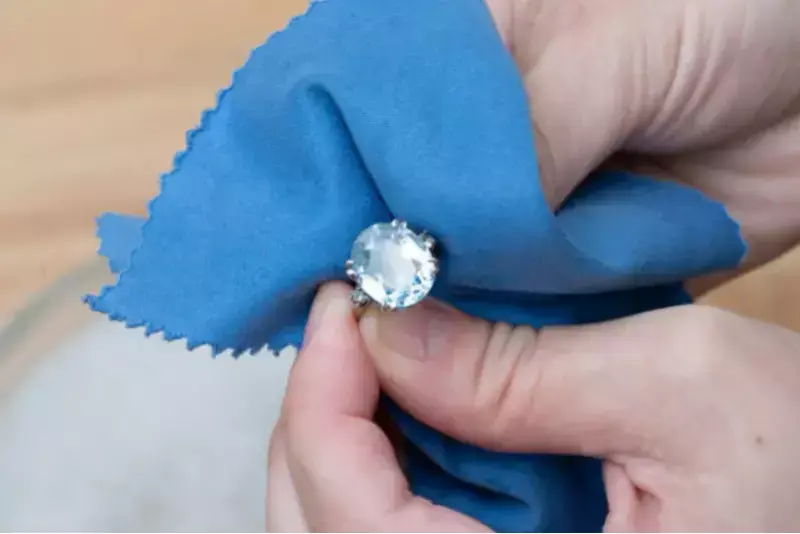
Always clean your jewelry thoroughly before shooting. Dust, fingerprints, and smudges can detract from the beauty of your piece and create additional work in post-production.
Use a Tripod

A tripod is essential for jewelry photography. It ensures stability and allows you to take multiple shots at different focus points, which is particularly useful for techniques like focus stacking. It also helps in maintaining consistent framing and composition.
Experiment with Lighting
Lighting is key to capturing the sparkle and details of your jewelry. Experiment with different light sources and positions to see what works best. You don't necessarily need dozens of lights or expensive modifiers – both jewelry shots could easily have been achieved with a single-point light source.
Minimise Reflections
Jewelry often has shiny, reflective surfaces that can pick up unwanted reflections. Use diffused lighting, light tents, or reflectors to minimize these reflections and ensure your jewelry is the focal point.
Conclusion
Effective jewelry photography requires meticulous planning and execution. By mastering pre-production techniques and post-production enhancements, you can capture stunning images that highlight the beauty and craftsmanship of each piece. Attention to detail in lighting, composition, and editing ensures professional, captivating photos that appeal to potential customers and elevate your brand.
FAQ's
What equipment do I need for jewelry photography?
You'll need a DSLR or mirrorless camera, macro lens, tripod, softboxes, or light tents for lighting, reflectors, and a clean background.
How do I minimize reflections in jewelry photos?
Use diffused lighting, adjust angles, use a polarising filter, and ensure the jewelry and surfaces are clean to minimize reflections.
What is the best background for jewelry photography?
Neutral backgrounds like white or black are ideal as they make the jewelry stand out without distractions. Textured backgrounds can also add depth and interest.
How do I make jewelry sparkle in photos?
Use bright, diffused lighting to highlight the sparkle of gemstones. Position lights to avoid harsh reflections and use a macro lens to capture intricate details.
Why is a macro lens important in jewelry photography?
A macro lens allows you to capture fine details up close without distortion, ensuring sharp and detailed images of the jewelry.
What props can I use in jewelry photography?
Props like silk fabric, vintage books, flowers, and reflective surfaces can add context and enhance the visual appeal of the jewelry.
.webp)

.webp)

.webp)

.webp)
.webp)


