


How to take Perfect Product Photos with your Phone?


Capturing perfect product photos with your phone is easier than ever. With the advancements in smartphone technology, you no longer need expensive cameras to achieve professional-quality images. All you need are a few simple tips and the right tools, and you can create stunning photos that showcase your products beautifully.
Start by finding good lighting. Natural light works best, so try taking photos near a window or outside during the day. Avoid using your phone's flash, as it can create harsh shadows. Next, focus on the composition. Make sure your product is the star of the photo by removing any distracting backgrounds and keeping the frame clean and simple. Using tools like Erase.bg can help you easily remove unwanted backgrounds and highlight your product.
Finally, remember to edit your photos. There are many free and user-friendly apps available that allow you to enhance your images, adjust brightness, and add filters. By following these easy steps and using your phone's features to their full potential, you can take perfect product photos that will attract customers and make your online store shine.
Why Phones are Great for Product Photography?
Yes, phones can give excellent results for product photography. Modern smartphones are equipped with advanced cameras that rival many traditional cameras in terms of quality. Here are a few reasons why phones can be great for product photography:
1. High-Quality Cameras
Modern smartphones feature high-resolution cameras with powerful sensors, capturing sharp and detailed photos. These advanced cameras often have multiple lenses, including wide-angle and telephoto options, allowing for versatile shooting. The combination of hardware and software enhancements ensures that smartphones can produce images with clarity and depth, making them suitable for professional-grade product photography.
2. Advanced Features
Smartphones come with advanced features such as portrait mode, macro mode, and various filters, which can significantly enhance product photos. Portrait mode creates a pleasing background blur, making the product stand out, while macro mode captures intricate details up close. Built-in filters and HDR capabilities help in achieving the perfect look, ensuring that products are showcased in their best light.
3. Portability and Convenience
Smartphones are portable and always accessible, making them incredibly convenient for product photography. You can quickly set up a photoshoot anywhere, whether at home, in a store, or on the go. This ease of use means you can capture spontaneous shots without needing bulky equipment, ensuring you take advantage of every opportunity to showcase your products.
4. Editing Apps
There are numerous powerful editing apps available for smartphones, allowing for quick and effective photo enhancements. These apps offer tools to adjust lighting, color, sharpness, and more, helping to perfect your product images. With features like cropping, retouching, and applying filters, you can achieve a polished and professional look directly from your phone, streamlining the editing process.
Which Phone Is Best for Product Photography?
Choosing the best smartphone for product photography in 2025 involves considering various factors like camera quality, features, and personal preference. Some of the top contenders include the iPhone 14 Pro, Samsung Galaxy S23 Ultra, Google Pixel 7 Pro, OnePlus 11, and Sony Xperia 1 IV. These smartphones offer advanced computational photography features, high-resolution sensors, and superior low-light performance, making them ideal for capturing detailed and vibrant product images.
Each of these smartphones brings unique strengths to the table, catering to different photography needs. Whether you prioritize excellent color accuracy, versatile lenses, AI enhancements, or manual control options, one of these models is likely to suit your preferences and help you achieve high-quality product photography.
Equipped with solid video modes, manual controls, and RAW photo capabilities, these phones ensure your product shots stand out. When choosing, consider key features like a main camera with at least 12 megapixels, a big sensor for ample light, and robust image stabilization.
15 Tips To Master Phone Photography
Capturing stunning product photos with your phone is easier than you think. By following these 15 simple tips, you can achieve professional-quality images that make your products shine. From utilising natural light and stabilising your phone to experimenting with angles and editing your photos, these tips will help you showcase your products beautifully. Get ready to impress your customers with eye-catching and polished product shots.
1. Use Natural Light
Natural light is the best for product photography because it provides even, soft illumination without the harsh shadows often caused by artificial light. Try shooting near a window or outdoors to take advantage of this.
Avoid direct sunlight, which can be too harsh, and opt for overcast days or the soft light of early morning or late afternoon. If natural light isn't available, use a lightbox or softbox to diffuse artificial light, creating a similar effect. This ensures your product is well-lit and the colors are accurate, making it more appealing to potential customers.
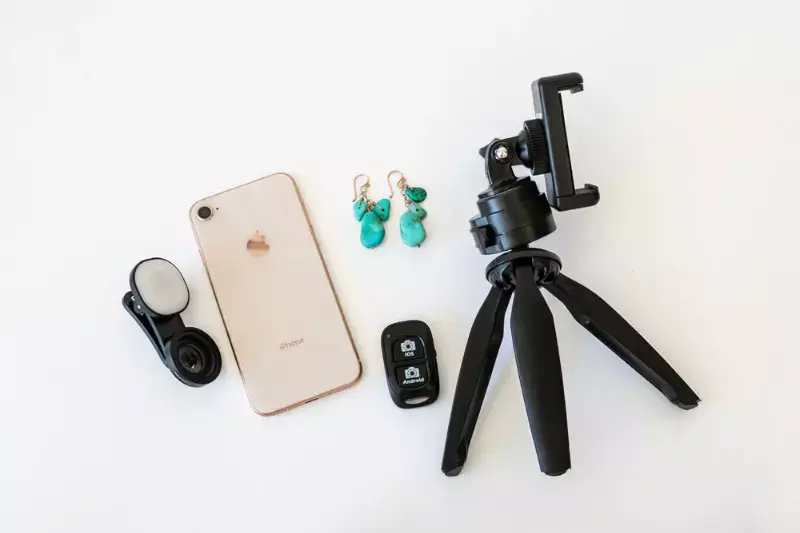
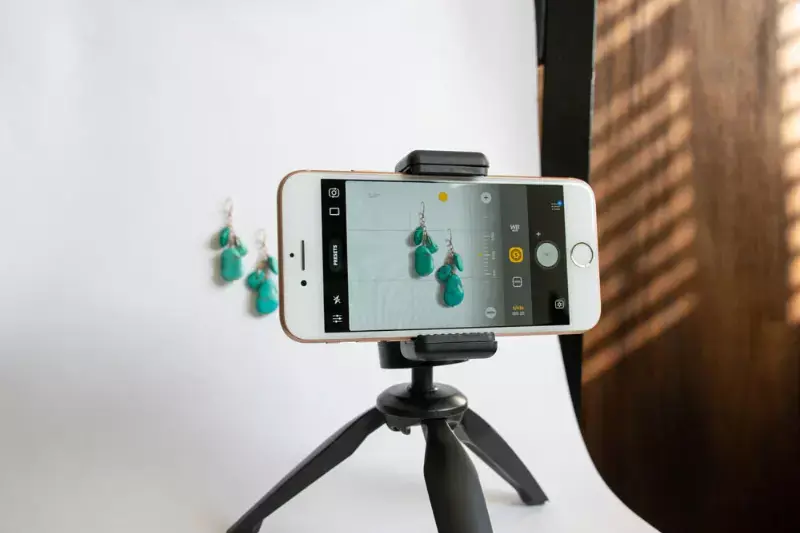
2. Stabilize Your Phone
Keeping your phone steady is crucial for clear, sharp photos. A tripod is an excellent investment for product photography, as it prevents camera shake and allows you to maintain consistent framing across multiple shots. If a tripod isn't available, stabilize your phone by resting it on a solid surface or using a stack of books.
Additionally, use the timer or a remote shutter to take the photo without touching your phone, further reducing the chance of movement. This stability helps in achieving crisp images, showcasing your product's details more effectively.
3. Clean Your Lens
A clean lens is essential for capturing clear, sharp photos. Dust, fingerprints, and smudges on the lens can blur your images and reduce their quality. Before starting your photoshoot, gently clean your phone's camera lens with a microfiber cloth. Avoid using abrasive materials or harsh chemicals, as they can damage the lens.
Regularly checking and cleaning the lens ensures that your photos are free from unwanted spots or blurs, helping to present your product in the best possible light. This simple step can significantly improve the overall clarity and detail of your images.
4. Use the Grid Lines
Grid lines are a helpful tool for composing your shots and ensuring they are well-balanced. Most smartphones have an option to enable grid lines in the camera settings. These lines divide the frame into thirds, both horizontally and vertically, helping you apply the rule of thirds.
This compositional technique involves placing the main subject off-center at the intersections of these lines, creating a more dynamic and visually appealing image. Grid lines also help you keep the horizon straight and align your product within the frame, enhancing the overall professional look of your photos.
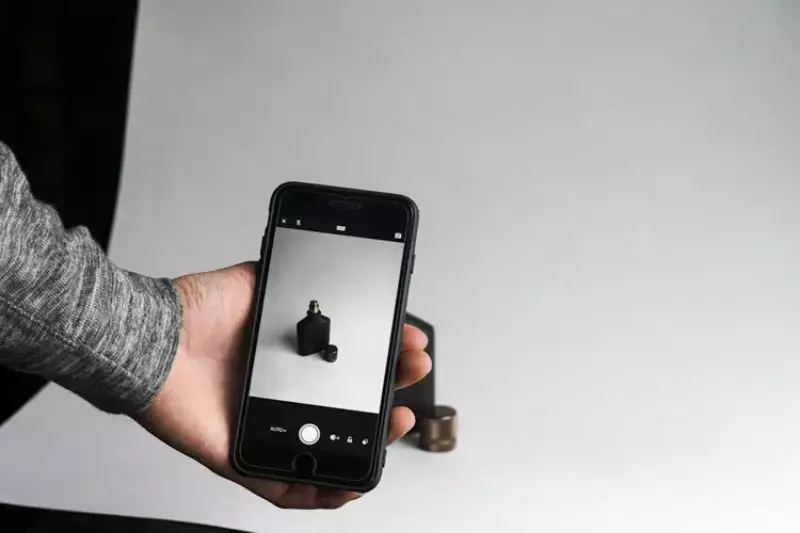
5. Focus on the Product
Ensuring your product is the focal point of the image is crucial for clear and detailed photos. On most smartphones, you can tap on the screen where the product is to lock focus. This not only sharpens the product but also adjusts the exposure to highlight its features.
Avoid focusing on the background or other elements that could distract from the product. If your phone has manual focus options, use them to fine-tune the focus. A well-focused product shot showcases the item's details, making it more attractive and informative for potential buyers.
6. Use a Simple Background
A simple background ensures that your product stands out and grabs attention. Cluttered or busy backgrounds can distract viewers and take focus away from the product. Use solid colors or plain backdrops like white, black, or neutral tones to highlight your product.
Tools like Erase.bg can help remove unwanted backgrounds, providing a clean and professional look. Additionally, using a consistent background for all product photos creates a cohesive and polished appearance for your online store. This simplicity enhances the product's visibility and appeal, making it easier for customers to focus on its features.
7. Experiment with Angles
Trying different angles can help you find the most flattering perspective for your product. Take shots from above, the side, and at various heights to see what works best. Each angle can reveal different aspects and features of the product, providing a more comprehensive view. For example, a low angle can make an item appear more prominent and impactful, while a high angle can highlight intricate details.
Experimenting with angles also adds variety to your product photos, making them more engaging for customers and helping you discover the most effective way to showcase your items.
8. Mind the Composition
Good composition is key to a visually appealing product photo. Ensure your product is centered or positioned according to the rule of thirds, with ample space around it for a clean look. Avoid placing the product too close to the edges of the frame, which can make the image feel cramped.
Consider the balance and symmetry of the shot, and eliminate any distracting elements. A well-composed photo draws the viewer’s eye directly to the product, highlighting its features and making it stand out. Thoughtful composition can significantly enhance the professionalism and attractiveness of your product photos.
9. Utilize Portrait Mode
Portrait mode on smartphones creates a pleasing background blur (bokeh effect), making your product the focal point. This effect mimics the shallow depth of field achieved with professional cameras, helping your product stand out against a softer, less distracting background.
When using portrait mode, ensure that the product is well-lit and positioned correctly for optimal results. Some phones allow you to adjust the intensity of the blur, so experiment to find the best setting. Utilizing portrait mode adds a professional touch to your photos, enhancing the overall aesthetic and appeal of your products.
10. Adjust Exposure
Manually adjusting the exposure helps in achieving the right brightness for your product photos. On most smartphones, you can do this by tapping on the screen to focus, then sliding your finger up or down to increase or decrease exposure. Proper exposure ensures that your product is light and bright enough, maintaining accurate colors and details.
Overexposed photos can wash out colors, while underexposed ones can obscure details. Regularly check and adjust the exposure for each shot, especially when lighting conditions change, to consistently capture well-lit and visually appealing product images.
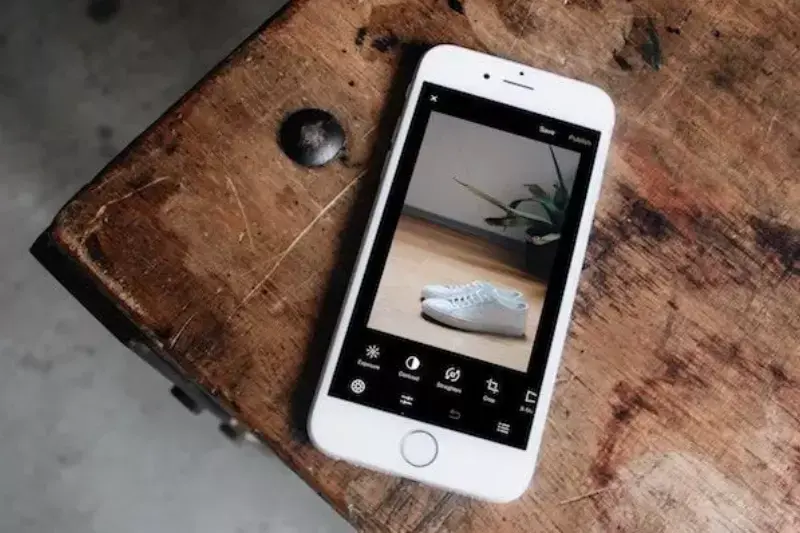
11. Edit Your Photos
Editing your photos enhances their overall quality and appeal. Use editing apps like Snapseed, Lightroom, or the built-in editor on your phone to make adjustments. Focus on tweaking brightness, contrast, saturation, and sharpness to bring out the best in your product.
Cropping can help remove unwanted elements and improve composition. Additionally, filters can add a consistent style to your photos. However, avoid over-editing, as it can make the images look unnatural. A few thoughtful adjustments can significantly elevate the professionalism of your product photos, making them more attractive to potential customers.
12. Show Details
Capturing close-up shots highlights the intricate details and textures of your product. Use your phone's macro mode, if available, to focus on small, important features that might be missed in standard shots. These details can be crucial for customers making a purchasing decision, as they provide a clearer understanding of the product's quality and craftsmanship.
Ensure the product is well-lit and steady to avoid blurriness. Showing details not only enhances the overall visual appeal of your photos but also builds trust with customers by providing a transparent view of the product.
13. Include Scale
Including an object for scale in your product photos helps customers understand the size and dimensions of your product. This is especially important for online shopping, where customers need help to see or handle the product physically. Use common items like coins, rulers, or other everyday objects to provide a clear reference.
Make sure the scaling object is placed naturally and doesn’t distract from the product itself. Providing a sense of scale reduces uncertainty and improves customer confidence, making them more likely to trust your product descriptions and make a purchase.
14. Use Reflectors
Reflectors help bounce light onto your product, reducing shadows and creating even illumination. You can use professional reflectors or simple household items like white foam boards, mirrors, or aluminum foil.
Position the reflector opposite the main light source to fill in shadows and add highlights, enhancing the product's details and texture. Reflectors are especially useful in low-light conditions or when shooting indoors. They ensure that your product is well-lit from all angles, improving the overall quality and attractiveness of your photos without needing additional lighting equipment.
15. Consistency is Key
Consistency in your product photos creates a cohesive and professional look for your online store. Use the same background, lighting, and editing style across all images to establish a unified visual identity. This consistency makes your store appear more organized and trustworthy, enhancing the overall shopping experience for customers.
Additionally, maintaining a consistent style helps in branding, making your products instantly recognizable. Plan your photoshoots to ensure all images follow the same guidelines, and keep a reference of your preferred settings and techniques to replicate the look in future shoots.
Using Props in Product Photography From Phone
Props in product photography can enhance the visual appeal of your images and help convey the product's use, style, and context. Here are some key points to consider when using props in product photography:
1. Enhance the Story
Props can help tell a story about your product, showing it in use or in a relatable setting. Choose props that complement the product and highlight its features. For example, placing a coffee mug next to a cozy blanket can evoke a sense of warmth and relaxation.
2. Keep It Relevant
Ensure that the props are relevant to the product and do not distract from it. They should enhance the product's appeal and provide context, not overshadow or compete with it. For instance, using fresh ingredients as props when photographing kitchen gadgets can make the scene more relatable.
3. Use Props to Show Scale
Props can help demonstrate the size of your product. Placing a common object like a coin, pen, or hand next to the product can give customers a better understanding of its dimensions, which is especially useful for online shopping.
4. Create a Theme
Using props that align with a specific theme can make your photos more cohesive and visually appealing. For example, seasonal themes (like autumn leaves for fall or beach items for summer) can add a relevant and attractive backdrop to your product photos.
5. Add Depth and Interest
Props can add depth and interest to your images by creating layers and textures. For instance, using fabric, plants, or books as background elements can make the product stand out and add visual richness to the photo.
Common Mistakes with Phone Product Photography
When doing product photography with a phone, several common mistakes can impact the quality and effectiveness of your images. Here are some of the most frequent errors to avoid:
- Poor Lighting: Using inadequate or harsh lighting can lead to shadows, glare, or uneven exposure, affecting the clarity and appeal of your product photos. Always aim for soft, natural light or diffuse artificial light to illuminate your subject evenly.
- Blurry Images: Camera shake or lack of stabilisation can result in blurry photos. Use a tripod or stabilise your phone against a solid surface to ensure sharp images, especially in low-light conditions or when shooting close-ups.
- Over-Editing: Excessive editing, such as overly saturated colors, unnatural contrasts, or heavy filters, can make your photos look unrealistic and unappealing. Aim for natural-looking enhancements that enhance rather than distract from your product.
- Cluttered Backgrounds: Busy or cluttered backgrounds can divert attention away from your product. Keep backgrounds simple and unobtrusive, or use tools like Erase.bg to remove distractions and maintain focus on your product.
- Ignoring Composition: Neglecting basic composition principles like the rule of thirds or proper framing can result in unbalanced or uninteresting photos. Take time to compose your shots thoughtfully, ensuring your product is the clear focal point.
- Inconsistent Branding: Lack of consistency in style, lighting, or backgrounds across your product photos can create a disjointed look on your website or social media. Establish a cohesive visual identity for your brand and maintain it throughout your photography.
- Not Utilizing Tools: Phones offer various photography tools and apps for editing, focusing, and exposure control. Failing to use these tools effectively can limit your ability to capture high-quality product images.
- Ignoring Product Details: Not capturing important details or features of your product can leave potential customers with unanswered questions. Ensure each photo showcases the product comprehensively, including close-ups of textures, labels, or functional elements.
- Lack of Preparation: Rushing through a photoshoot without proper planning or preparation can lead to missed opportunities for creative shots or overlooked technical details. Plan your shoots, considering props, backgrounds, and lighting needs.
- Not Testing Different Angles: Failing to experiment with different angles and perspectives can result in dull or uninspired photos. Explore various viewpoints to find the most flattering and engaging angles for showcasing your product.
By avoiding these common mistakes and focusing on technique, preparation, and attention to detail, you can significantly improve the quality and impact of your product photography using a phone.
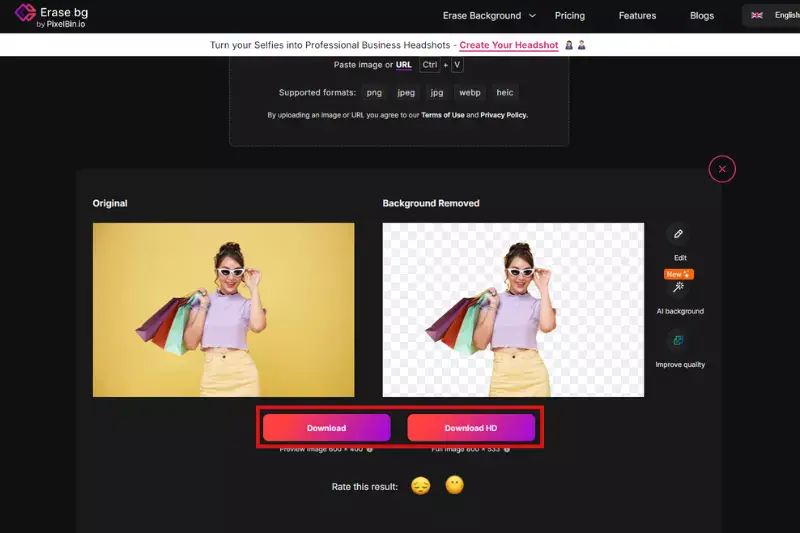
Remove Background from your Photos with Erase.bg
To remove backgrounds from your photos effortlessly, Erase.bg offers a powerful solution. This AI-powered tool quickly and accurately isolates your product or subject from its background with just a few clicks.
Whether you're an e-commerce retailer, a photographer, or a content creator, Erase.bg simplifies the process of creating clean, professional-looking images. Save time and enhance your visual content by using Erase.bg to seamlessly remove backgrounds and focus attention squarely on your products or subjects.
Step 1 - Upload Your Image: Visit Erase.bg and upload the photo from which you want to remove the background. You can drag and drop the image or click to upload it directly from your device.

Step 2 - Wait for Processing: Once uploaded, Erase.bg uses AI technology to analyze the image and automatically remove the background. This process usually takes just a few seconds.

Step 3 - Download Your Image: Once satisfied with the results, download the edited image without the background. Erase.bg provides options to download in various formats (PNG, JPG) and resolutions suitable for your needs
Conclusion
Mastering product photography with your phone involves using natural light, stabilizing your device, focusing on composition, and editing thoughtfully. By following these tips and avoiding common mistakes, you can create professional-quality images that showcase your products beautifully, enhancing their appeal and increasing customer engagement and sales.
FAQ's
What is the best lighting for product photography with a phone?
Natural light is ideal for product photography with a phone. Position your product near a window or outdoors to utilize soft, diffused light. Avoid harsh sunlight to prevent shadows and overexposure.
How can I stabilize my phone for clear product photos?
Use a tripod or stabilize your phone against a solid surface to minimize camera shake. This ensures sharp images, especially in low-light conditions or when shooting close-ups.
What are the best apps for editing product photos on a phone?
Popular apps for editing product photos on a phone include Snapseed, Adobe Lightroom Mobile, VSCO, and PicsArt. These apps offer tools for adjusting exposure, contrast, saturation, and more.
Should I use portrait mode for product photography?
Portrait mode can be beneficial for product photography, as it creates a pleasing background blur (bokeh effect) that emphasizes the product. Experiment with this feature to enhance your photos.
How do I choose the right background for product photos?
Opt for a simple and uncluttered background that complements your product without distracting from it. Solid colors, neutral tones, or using tools like Erase.bg to remove backgrounds can create a clean look.
How can I showcase product details effectively with a phone?
Use close-up shots and macro mode (if available) to highlight intricate details, textures, and features of your product. Ensure adequate lighting and focus to capture these elements clearly.
.webp)

.webp)

.webp)

.webp)
.webp)


